
INITIATIVE: To build a residence showcasing sustainable design; designed to inspire and educate others to follow the sustainable design path.
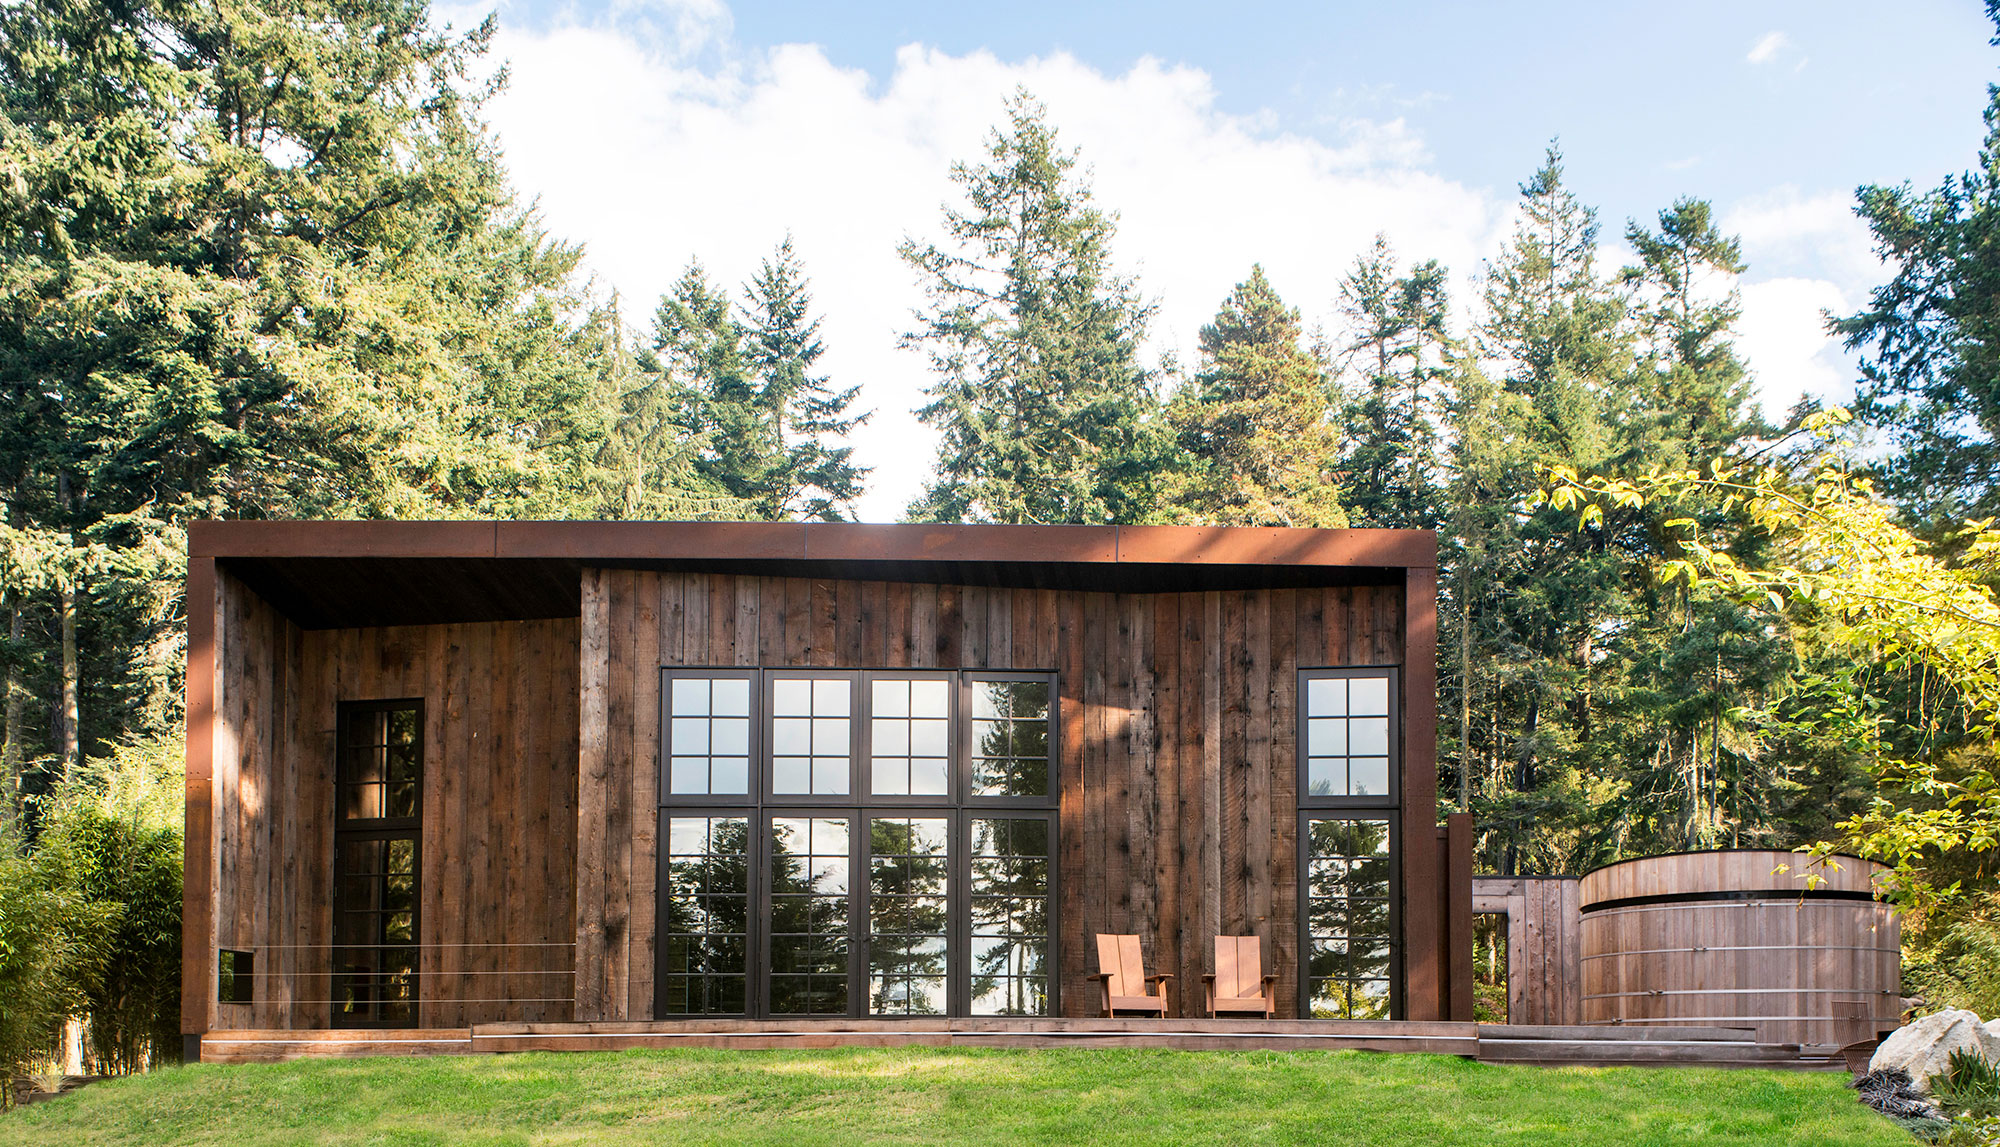
PROJECT: A 1600sf waterfront guest house, to be used for summer season rental, exhibiting local artists, and to be a learning space focused on sustainable design. Completed 2017
DESIGN CRITERIA: The architecture had to be sensitive to the rural landscape, but with a decidedly modern interpretation, and incorporate new technologies for a sustainable design/build.
EXPERIENCE CRITERIA: To function as a “showroom” where people can experience what residential sustainable design does, is, and feels like in daily use.
Architectural Design: INCLINEDESIGN, James Ferris
Engineering: Maple Brook Engineering, Brandon Helms.
Client: Original Evergreen Experience (OEX) LLC.
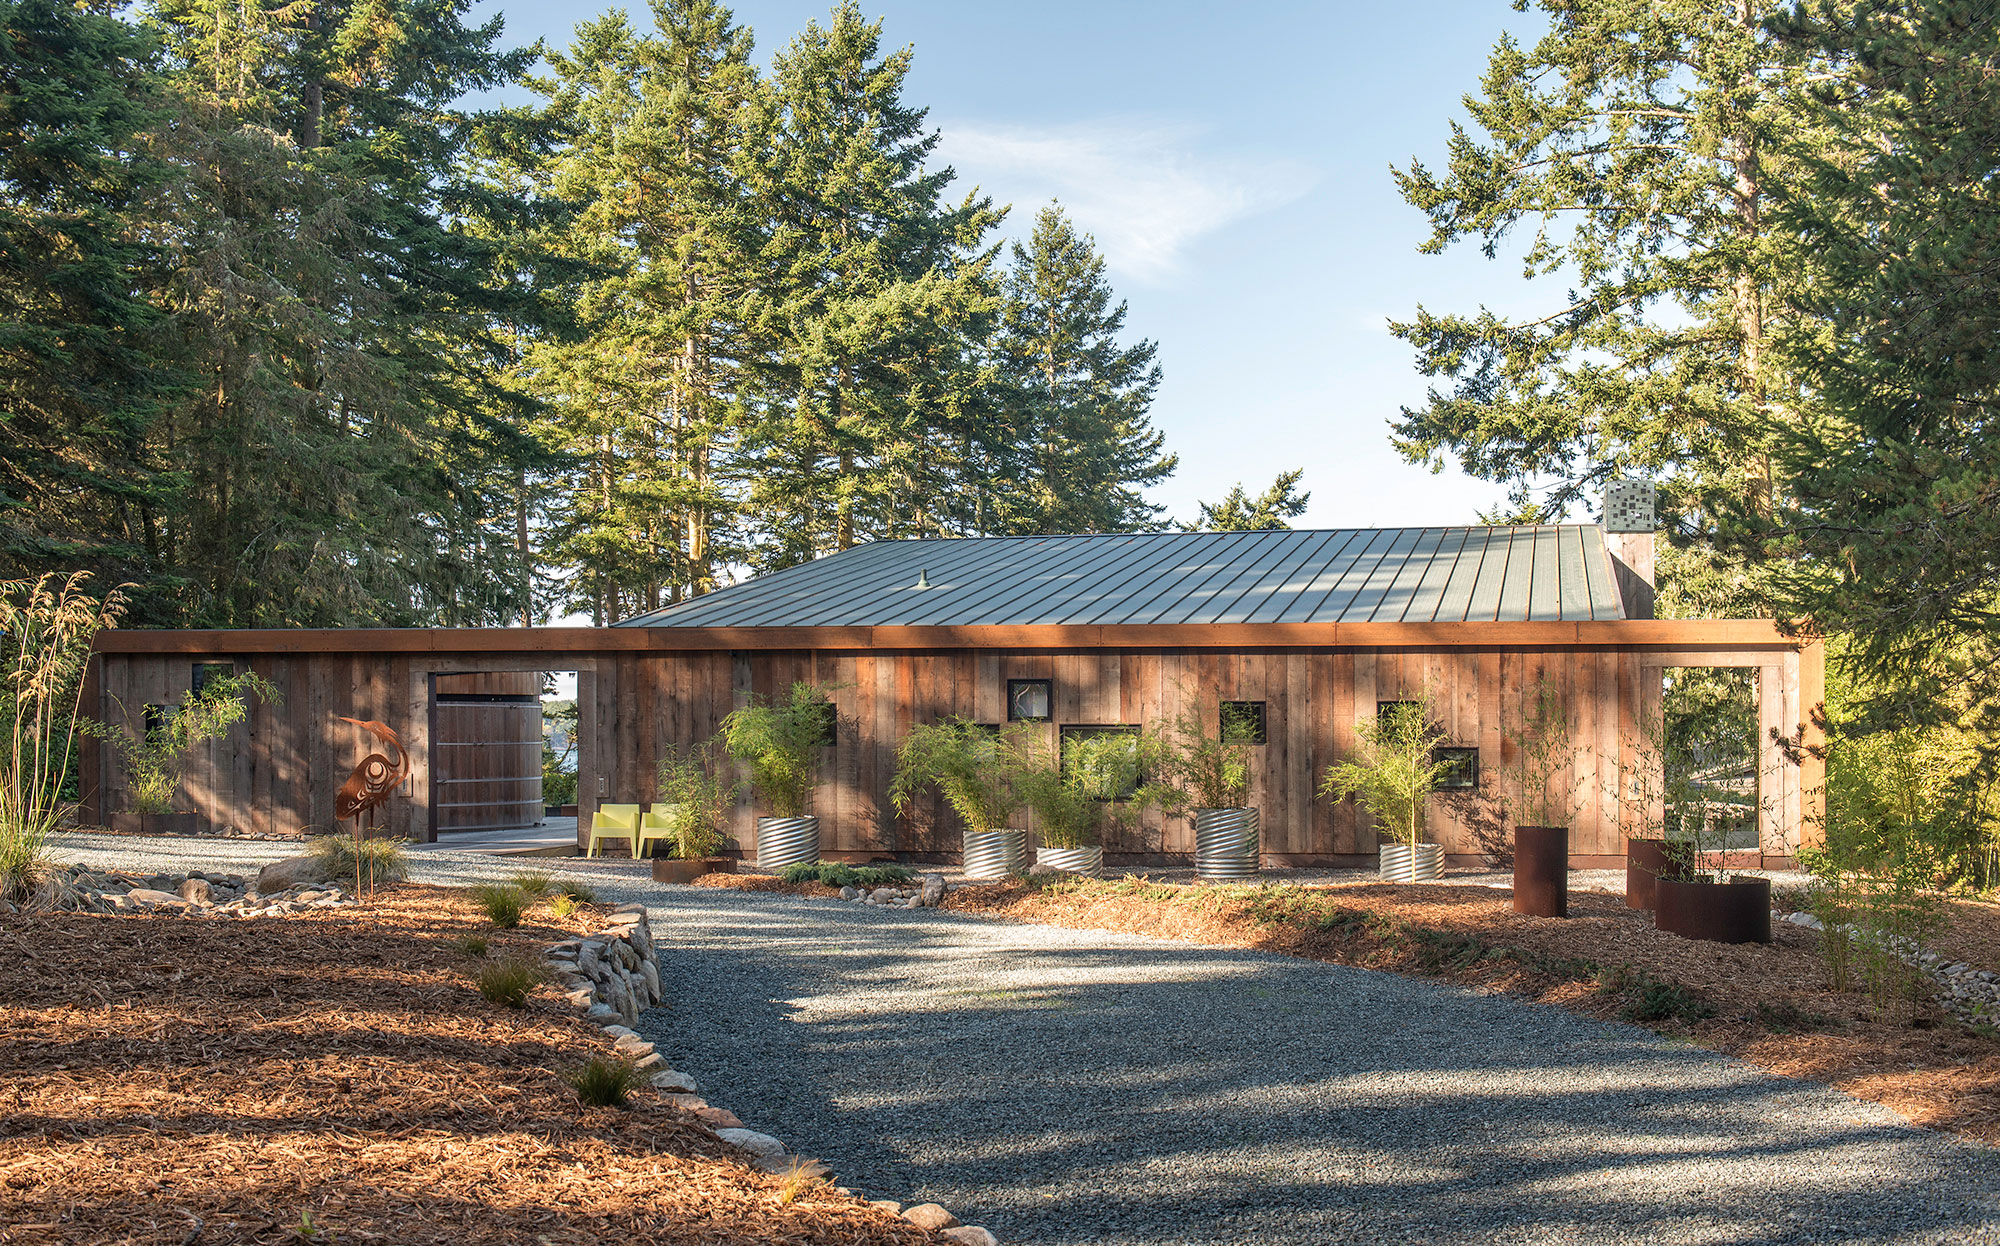
THE BARN GALLERY
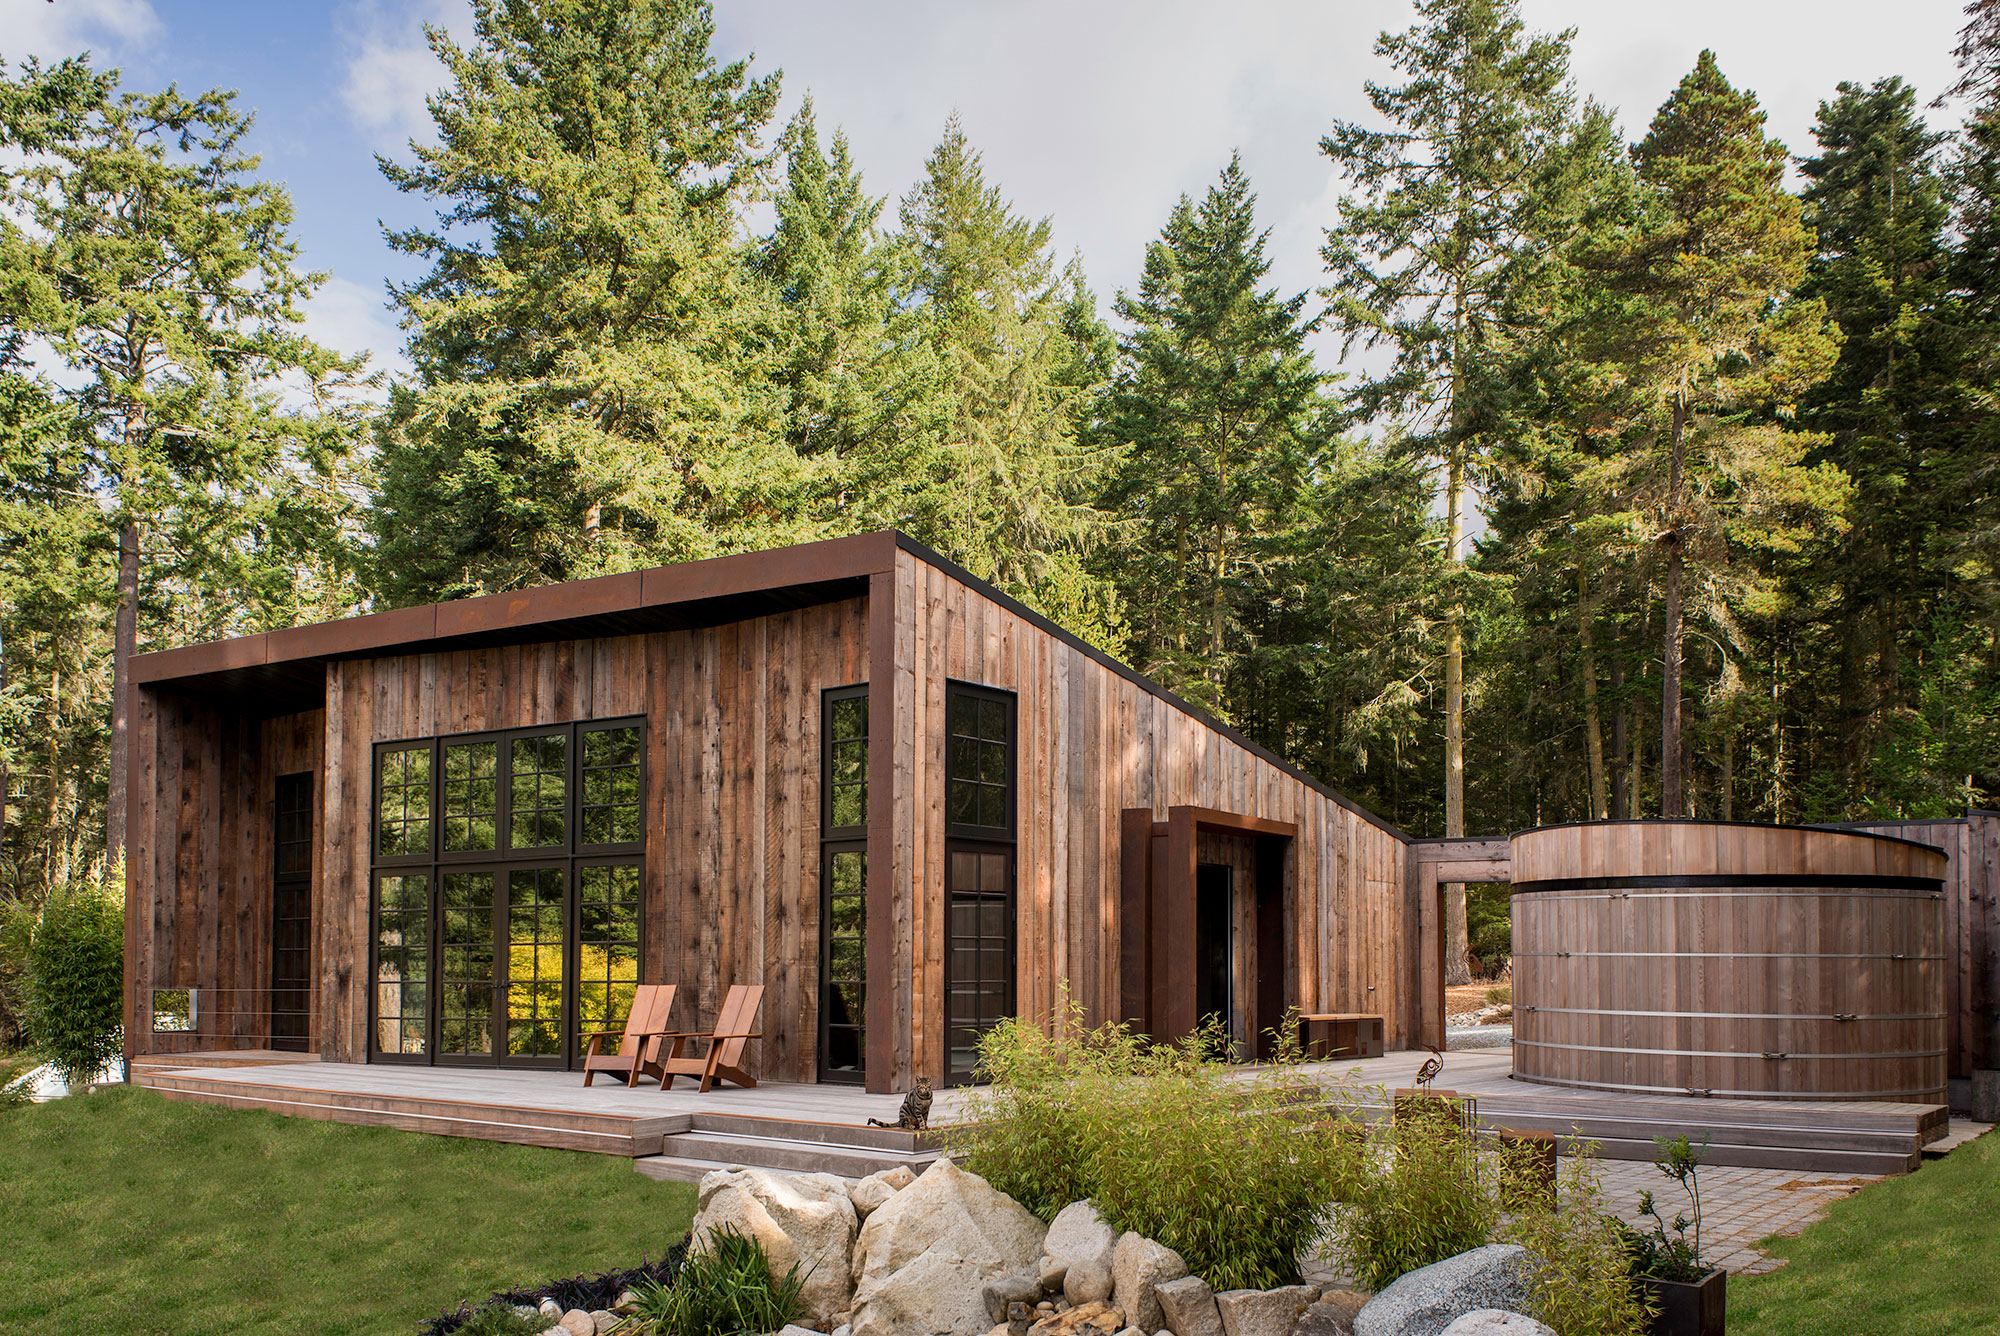
Limited budgets, and limited resources of an island location, coupled with strict design criteria, drove the design process and product choices. These criteria included “deconstruction” of the ’70’s era 2-story house while retaining the original foot print; SIPs construction, automated LED lighting control with a centralized driver panel, on-line energy monitoring, HRV & heat pump technologies, rainwater catchment, and using reclaimed wood and metal elements. The result is a tight, energy efficient house combining the very best of old and new.
RAIN HARVESTING
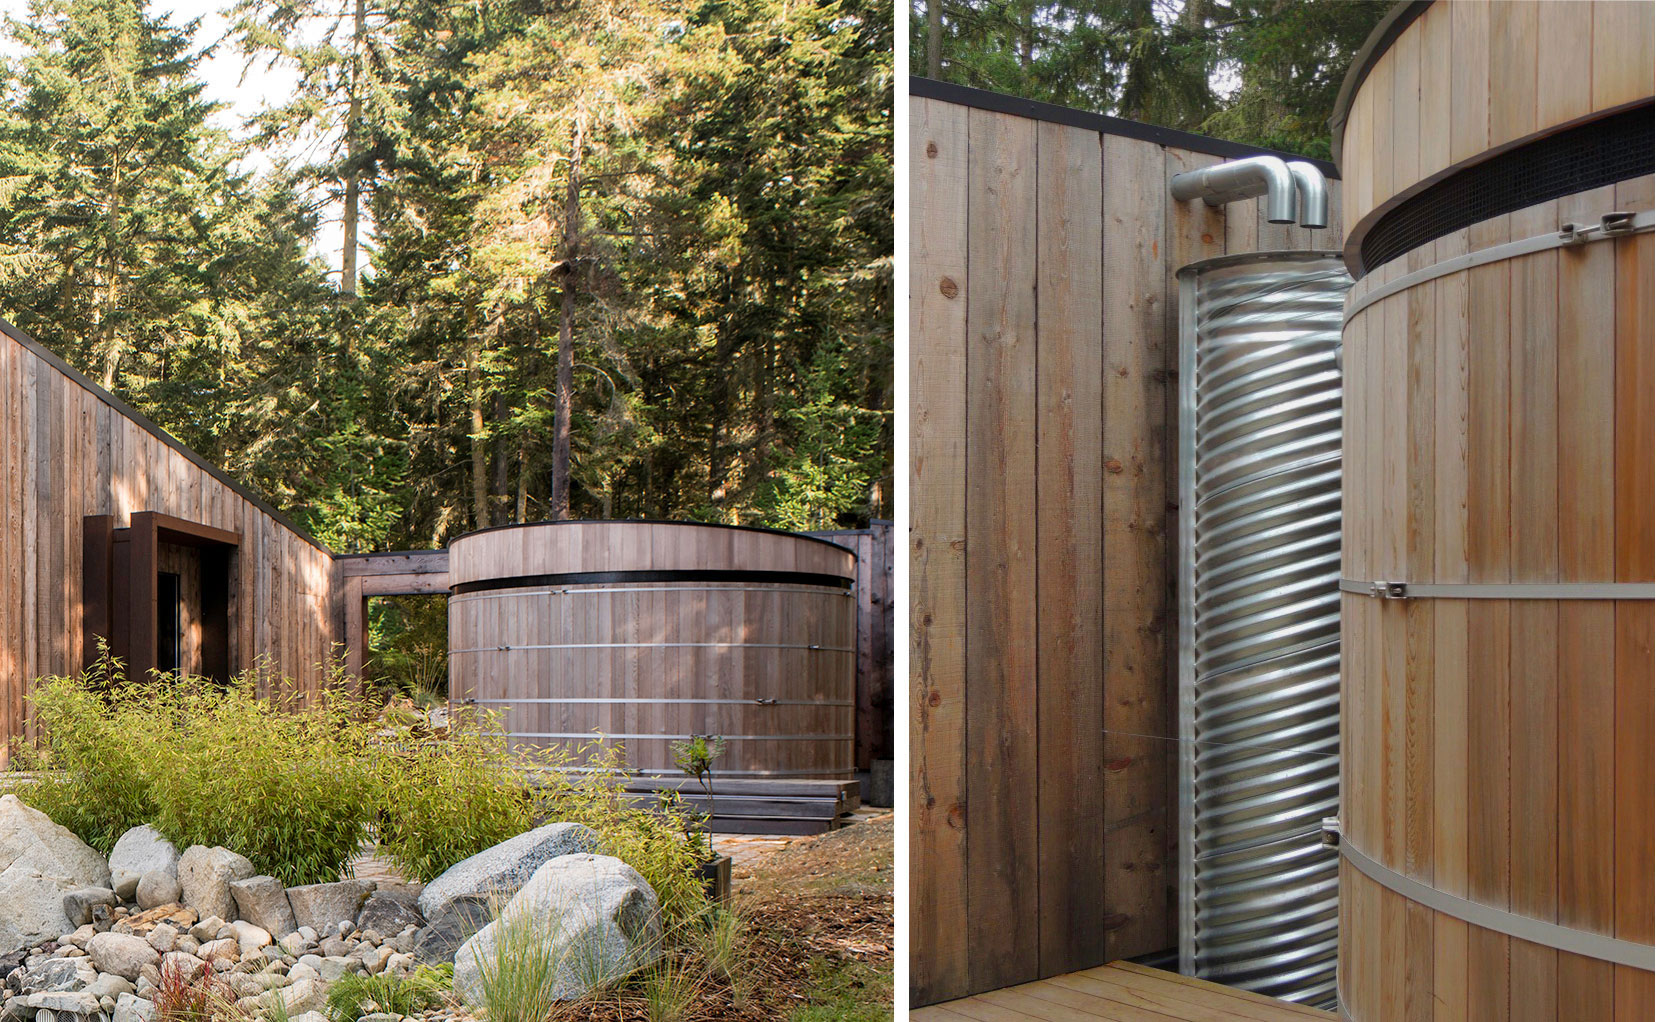
Rainwater harvesting has a double benefit: collecting a valuable resource (water) for daily use, while controlling/diverting runoff from the roof, driveway and landscaping (storm water management).
The water collected is used to establish drought-tolerant natural landscaping, and for all household use, including potable. Excess runoff from the roof and driveway is diverted into a rain garden, which naturally filters the water before it flows across a meadow to the channel below.
The system was designed for easy maintenance and operation and a conscious effort was made for aesthetics, as showcasing the process was part of the design criteria. It had to look good, since it is located at the entrance of the house! The 9500 gallon cedar tank (from Forest Cooperage in BC) has a NSF 40ml liner and a custom-designed shed roof to echo the roof on the house.
The often unsightly pre-filtration first-flush system, in this case a 12” PVC pipe configuration (40 gallons) is hidden within a section of recycled steel drainage culvert. Final filtration; 2 sediment filters and UV disinfection, is located inside the mechanical room. The larger particles (pine needles and leaves!) are collected/filtered at the top of the tower prior to flowing into the first-flush filtration.
The result is a continuous supply of potable water to the house, along with outdoor faucets for landscape maintenance.
HEATING SYSTEM: SANDEN SANCO2 Heat Pump/Water heater
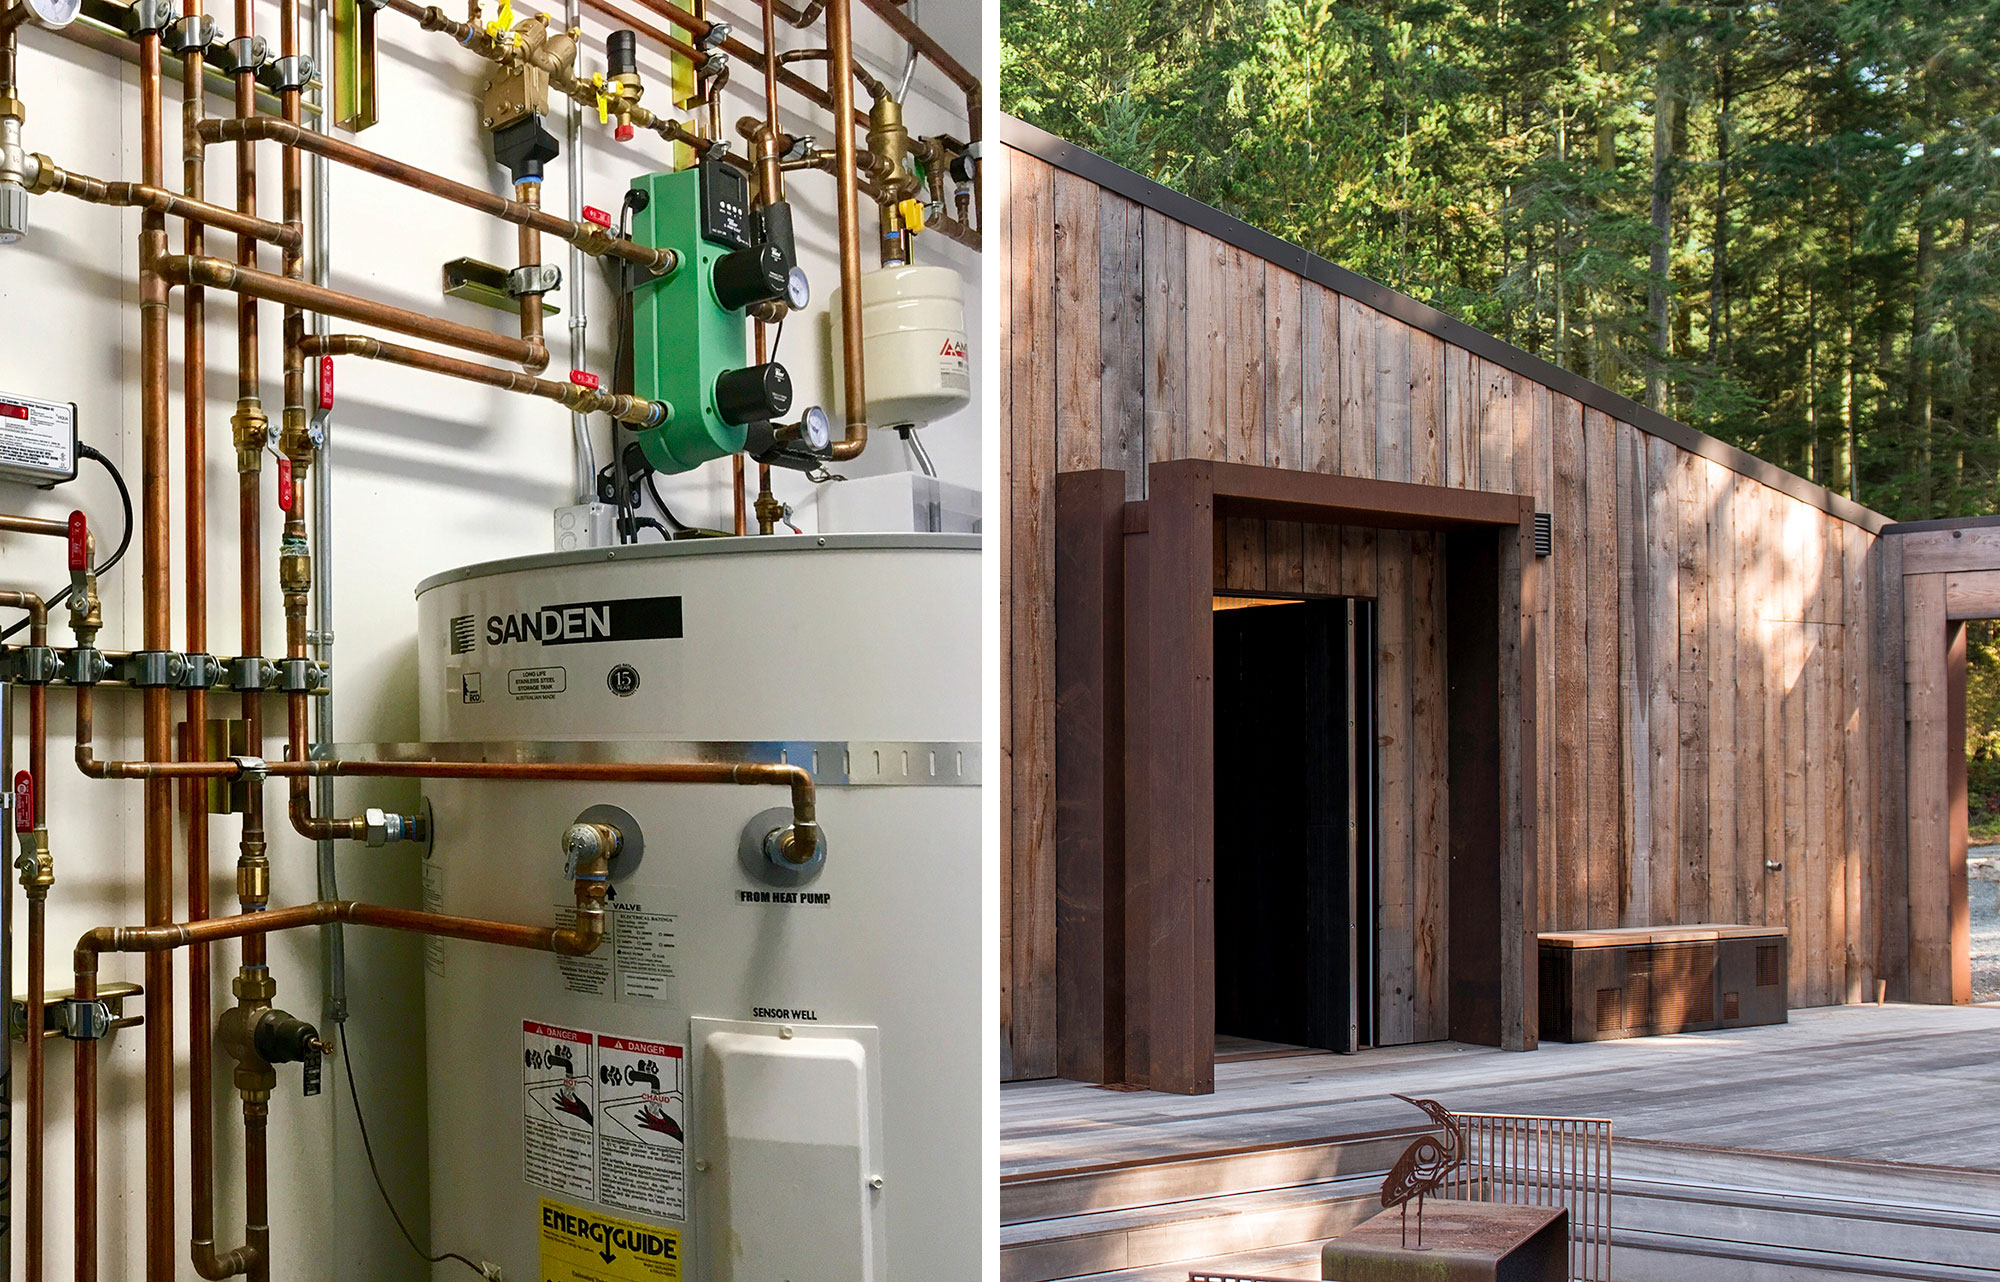
The radiant water heating pipes in the heavily insulated concrete slab required a power source that would meet “sustainable” criteria without ‘breaking the bank’. A Sanden system was specced, and selected because it is a very energy-efficient alternative, absorbing heat from outside air to heat the domestic hot water and the radiant floor system. The first UL-listed system in the US was delivered to the Barn Gallery in Fall 2016. The utilitarian exterior device (a large metal box containing the fan/heat pump) created a design challenge being near the entrance, but was quickly resolved by an attractive cedar-topped Corten steel bench which effectively hides the fan yet allows free air circulation. More about Sanden
The City of Vancouver BC asked to use the bench design for a recent proposal focused on installing Sanden systems in many of their city buildings).
The result is a cost efficient energy source for heating; it costs less than a couple of dollars a day (even on the coldest winter days). And of course you can’t beat the radiant floor experience!
VENTILATION HRV: ZEHNDER 200
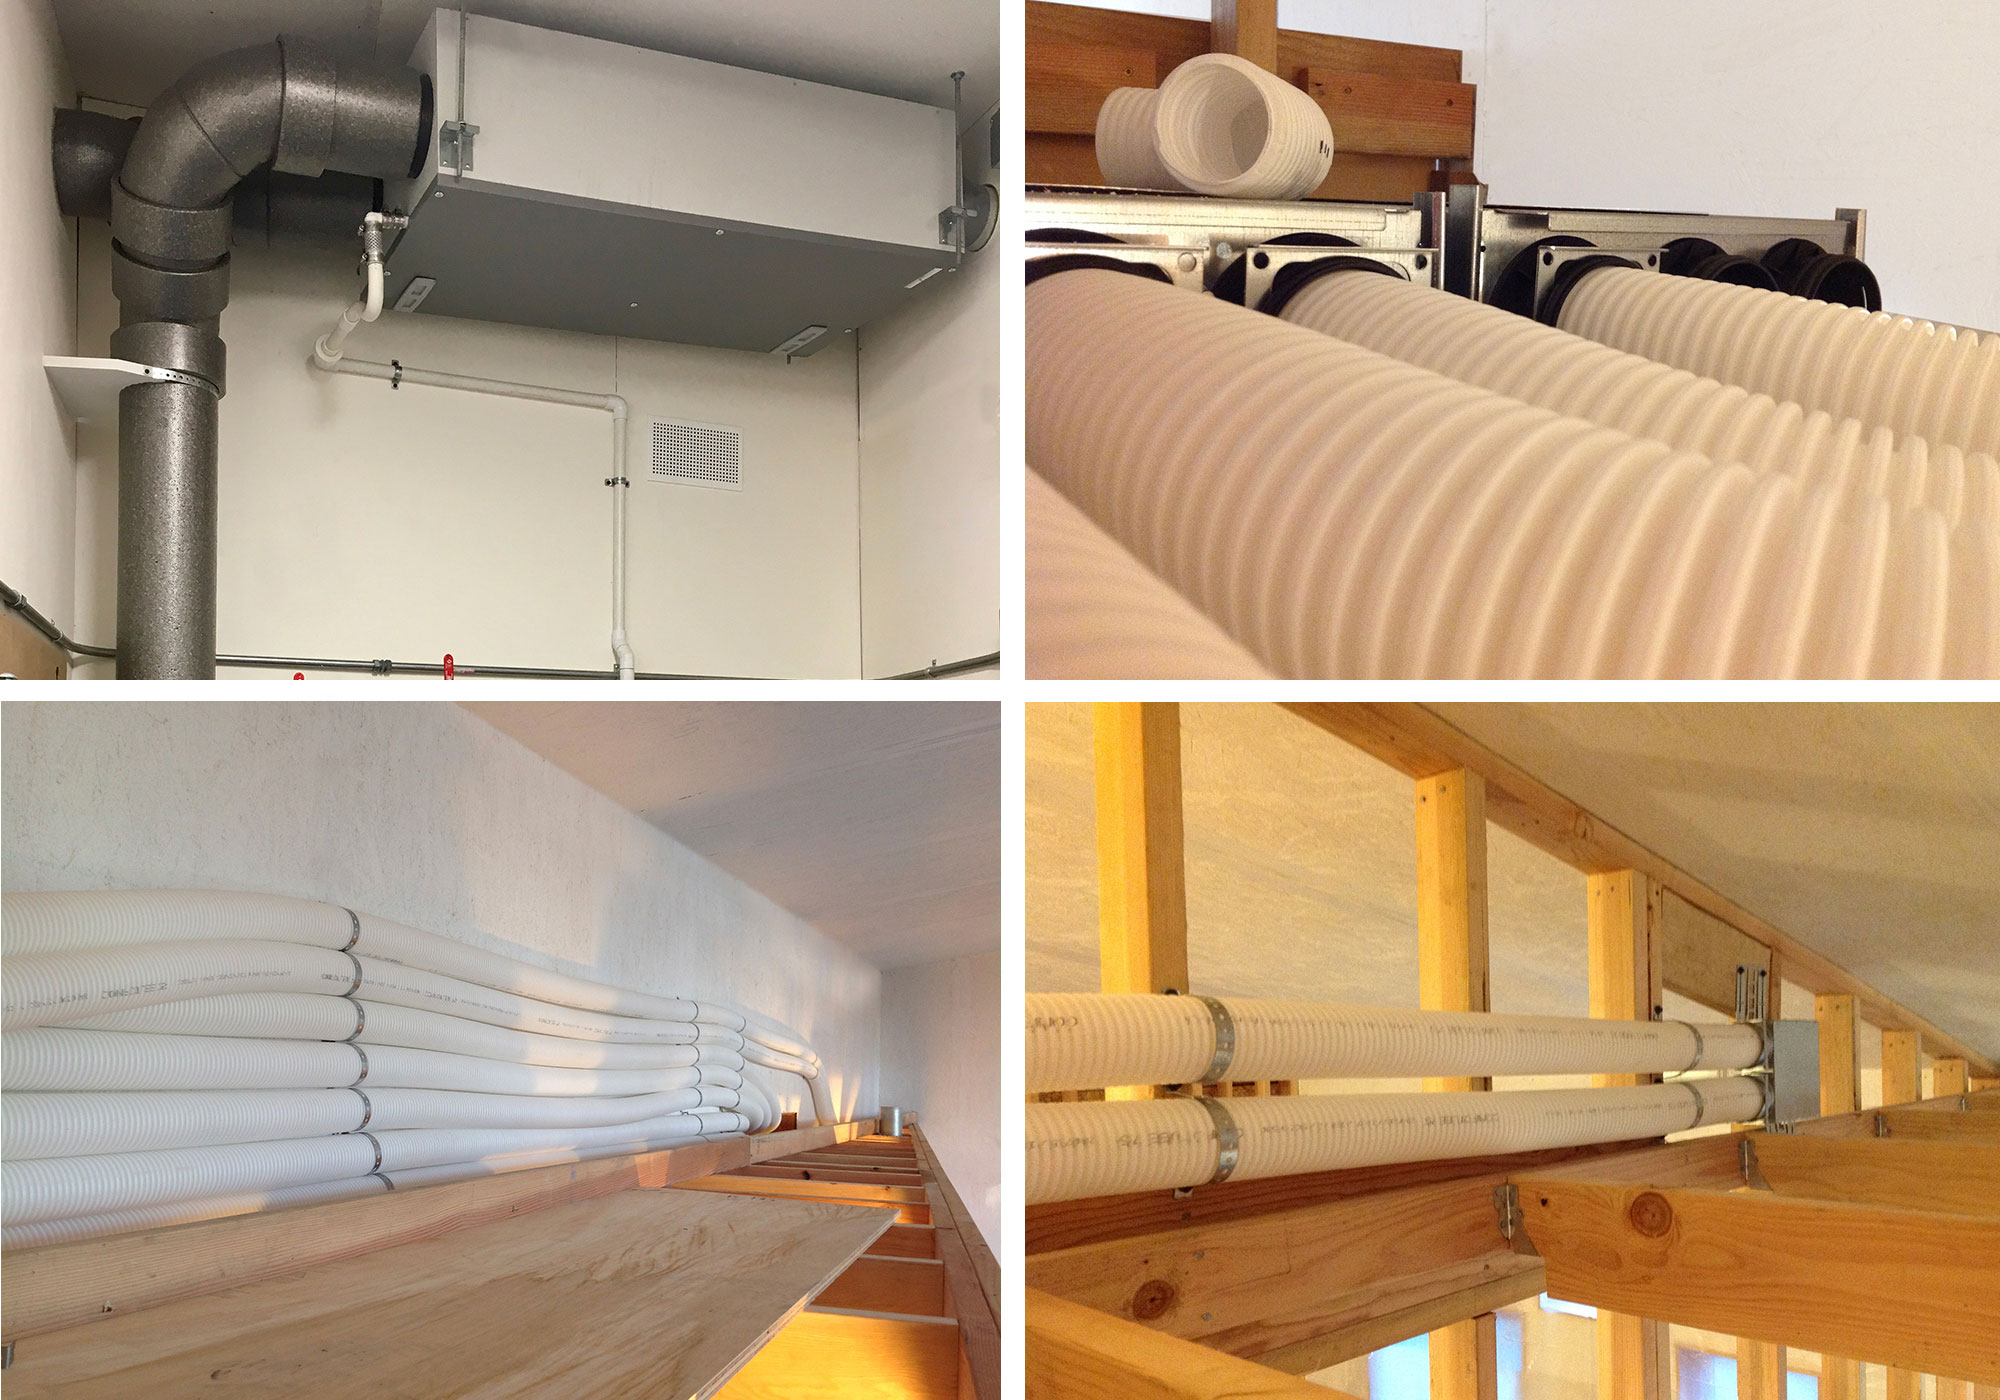
As we are all aware, tight houses need to breathe (have a continuous supply of fresh air), to eliminate humidity/condensation, which produces mold/mildew, and also eliminate air stagnation from activities such as food preparation. The INCLINEDESIGN team chose the Zehnder HRV 200 system, even though it exceeded the budget. It was selected in part because of expert assistance at the early design stage, and installation training from Zehnder for both our contractor and installer. This resulted in a one-weekend completed install by the professional/first time installer Steve Robertson, with the help of the two designers.
The Zehnder 200 was professionally balanced by Jim Harmon from the Opportunity Council, who noted it was as close to factory specs perfect as it could be! More about Zehnder
The result is continuous fresh air to the interior of the house, while stale air is expelled without heat loss. The added benefit is the designers better understand the installation process for future HRV design.
LED LIGHTING
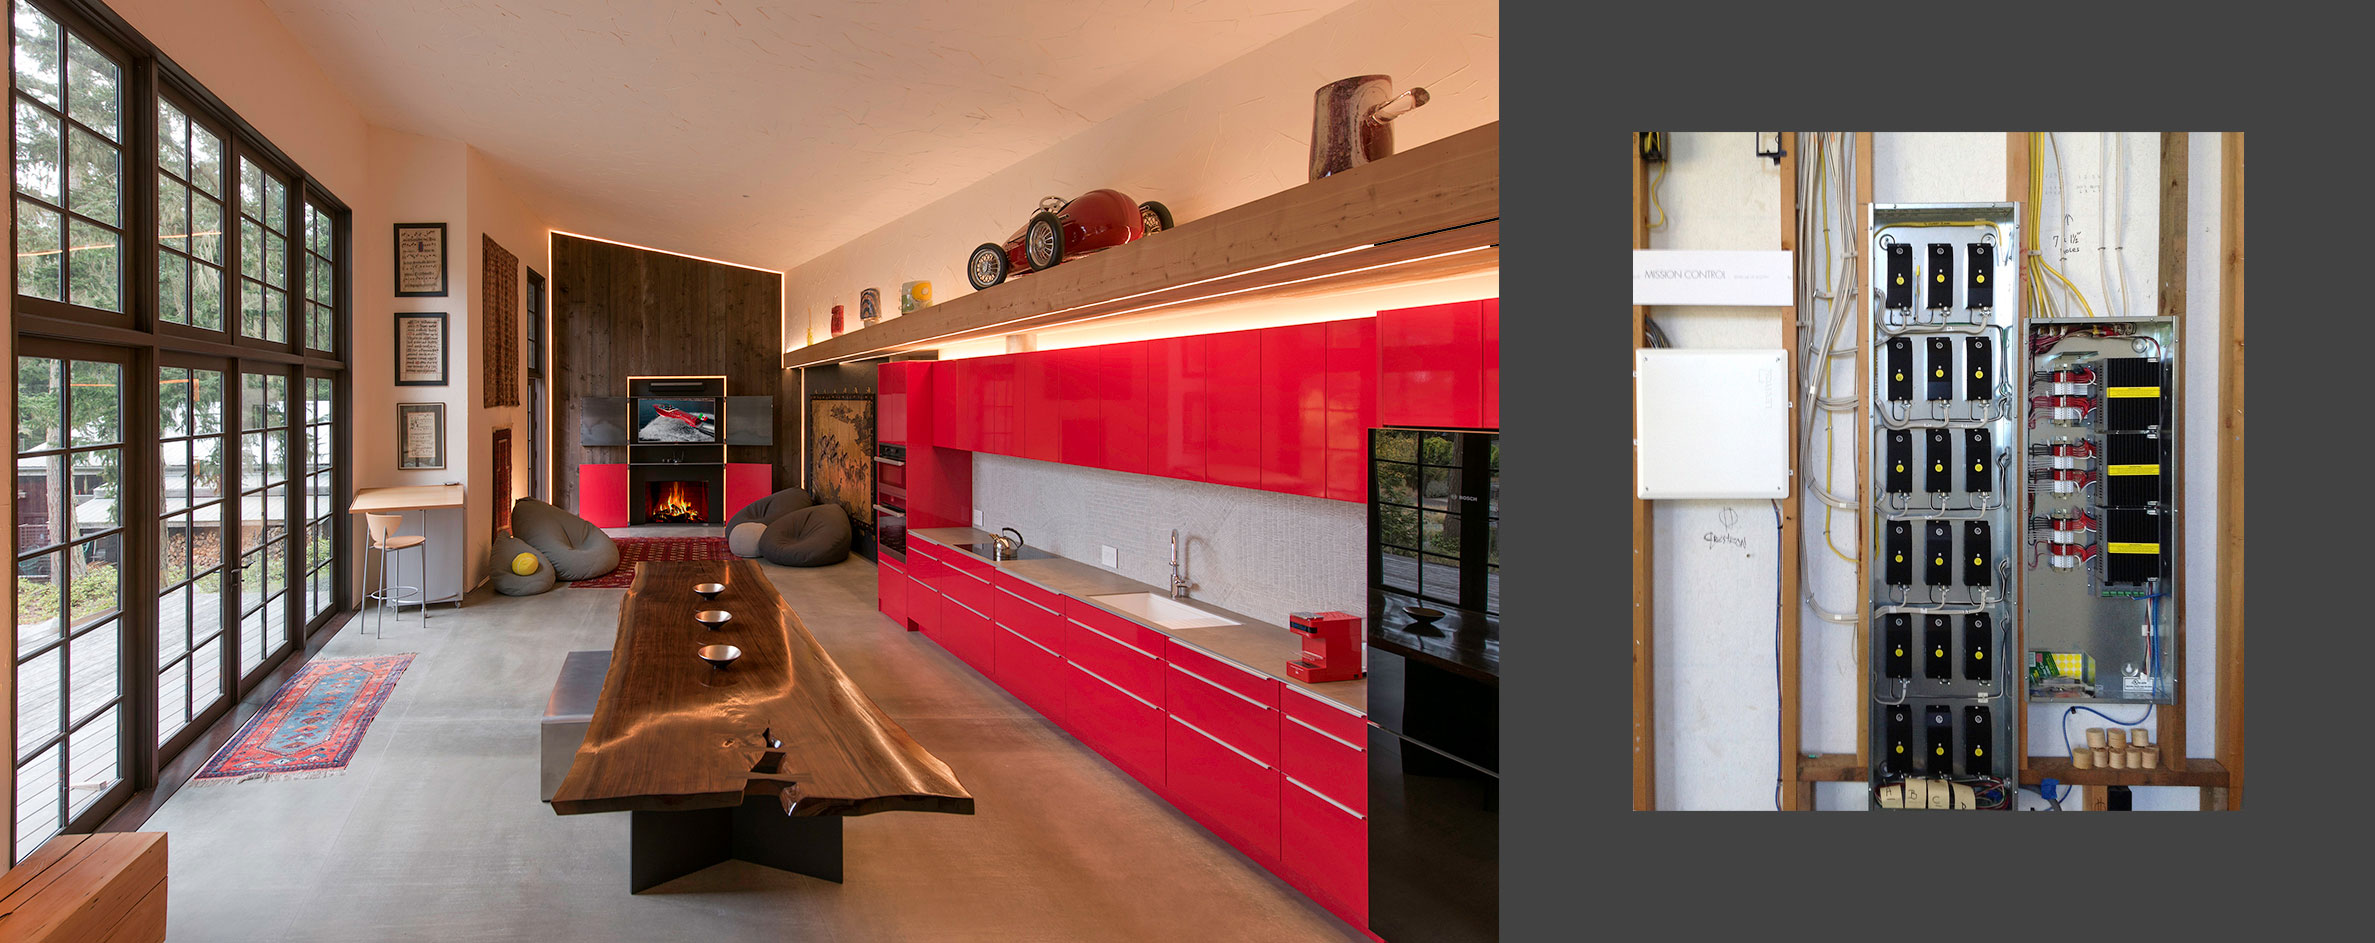
First big challenge was to get the electrical inspector to overcome tradition and accept the centralized LED driver-panel approach, and approve the electrical plan!
This approach is not new in the commercial space, however the inspector initially required a UL field test (expensive and time consuming). After considerable discussion he finally changed his requirement for the LED-driver installation, which included driver placement specifications within an enclosed panel (from Magnitude, who supplied the LED drivers). The LED lights for the house were tested full-on for 24 hours, and the heat (or lack of) in and near the centralized enclosed driver-panel was minimal.
The LED lighting control selected is Crestron PYNG, the market entry Crestron product, and with this all but 5 keypads (light switches) were eliminated.
The benefit is faster LED light installation; the electrician wired the 24v lights directly to the drivers in the panel, eliminating switches and junction boxes. It features easy access for future driver replacement. Control of lighting is with a user-friendly app on your personal smart device (phone/tablet), or the house-dedicated iPad.The 100% LED installation contributed to the reduced energy use and associated lower costs.
RECLAIMED MATERIALS
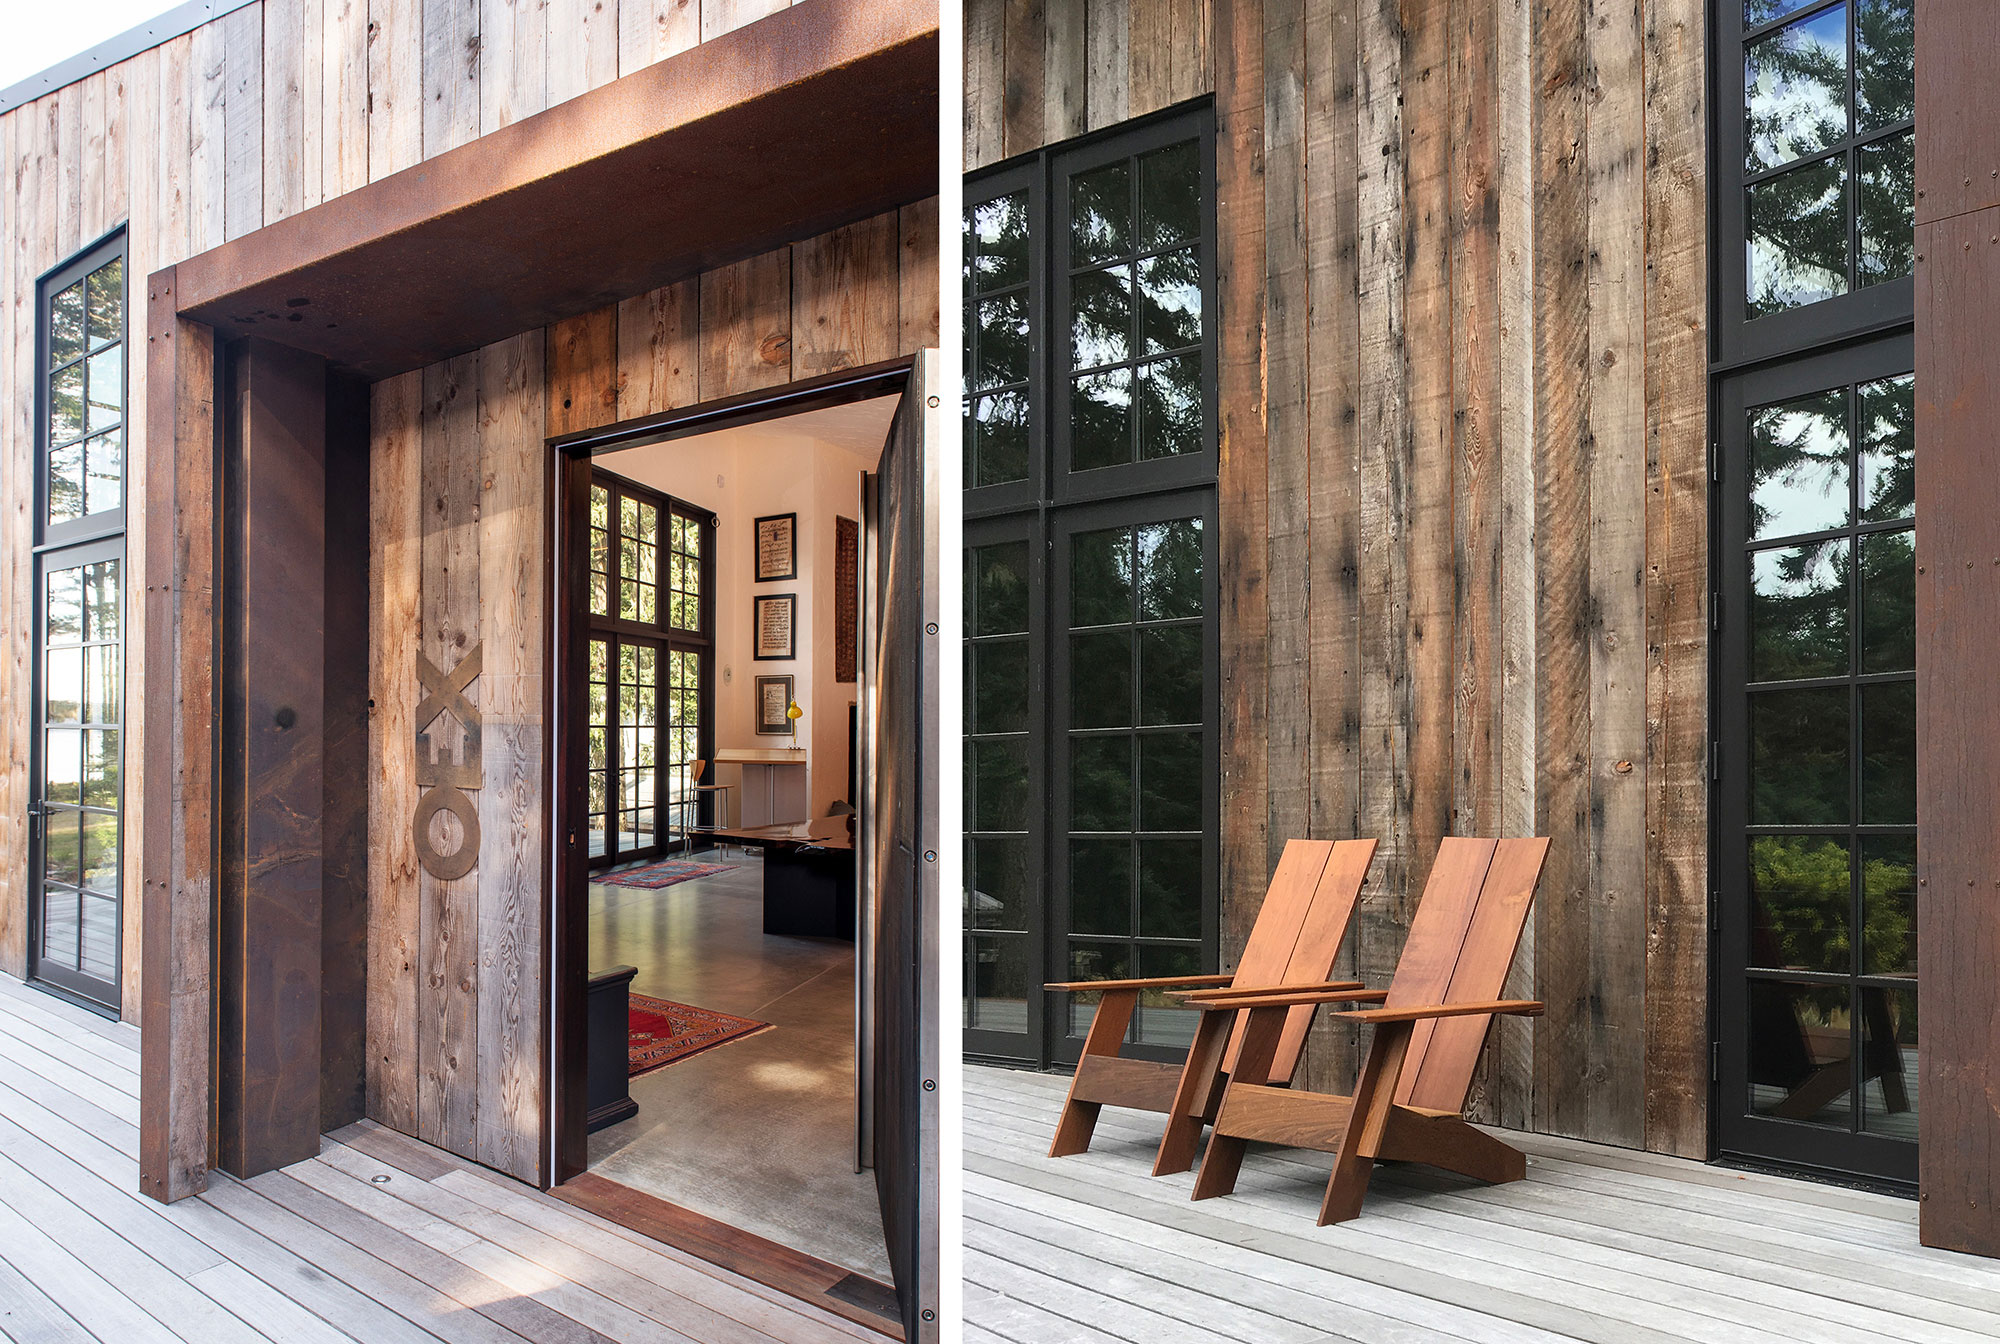
Almost all the wood from the original 1970 house was saved for re-use in the Barn Gallery or in other Island projects. About 50% of the exterior siding on the new house was locally re-sawn from the original 2X12X 24 foot floor joists, themselves actually milled from trees cut on the property in the 1970’s. The remaining exterior siding was sourced from a 1930’s warehouse in LA by Duluth Timber Co. in Bow, Washington.
Much of the interior wood panelling is from the exterior cedar siding of the original house; sandblasted and whitewashed. The sixteen foot tall planks on the fireplace wall came from a dismantled building outside Vancouver BC. The front door of 3” thick VG white pine planks came from a deconstructed Co-op building in eastern Washington.
Using reclaimed wood from the ‘industrial forest’ is not something new for the designers, however It’s now becoming much harder to source good product at a reasonable cost. It’s a choice made over the past 18 years that has become a signature feature of their sustainable architectural and interior design.
The benefits are numerous, including reducing demand for harvesting new trees, reducing the waste stream, and experiencing the history-rich patina of the material from the original buildings.
DECONSTRUCTION
The estimated cost of demolition was more than the actual final cost of deconstructing the original 2-story house. 80% of the material was saved/reused and only 20% unavoidably dumped in the landfill.
Usually deconstruction is far more costly. The deconstruction costs were greatly reduced by trading deconstruction labor for reusable materials from the house. Materials not traded or given away were used in the new build.
An example of how far you can go: the entire lower level of the original house was cut into sections, (reminiscent of prefab panels) and transported to another island, where it was used to build a workshop on a new concrete slab. Kitchen cabinets, appliances, bathroom fixtures, garage doors, insulation, ceiling beams, copper plumbing, windows, were all re-purposed on the Island. It’s often just a matter of marketing and timing….all the usable insulation went during a very cold spell, to be used in out-buildings such as pump houses. Dimensional lumber was de-nailed and reused where it was not structural. After the designers designed a green house using all the second floor windows, the windows went really quickly to a community farm for growing food in the off season.
What ultimately could not be reused went to landfill on the mainland. This included nearly 6.5 tones of sheetrock, asphalt composition roof and the disintegrating plywood under layment, and a rubberized asphalt deck material. Not long after the deconstruction process was completed, a resource was found that would even have ground up the sheetrock for re-purposing! We’re keeping this in mind for next time….
The result of the deconstruction was a valuable contribution to the community, and some really good wood was re-integrated into the Barn Gallery build..
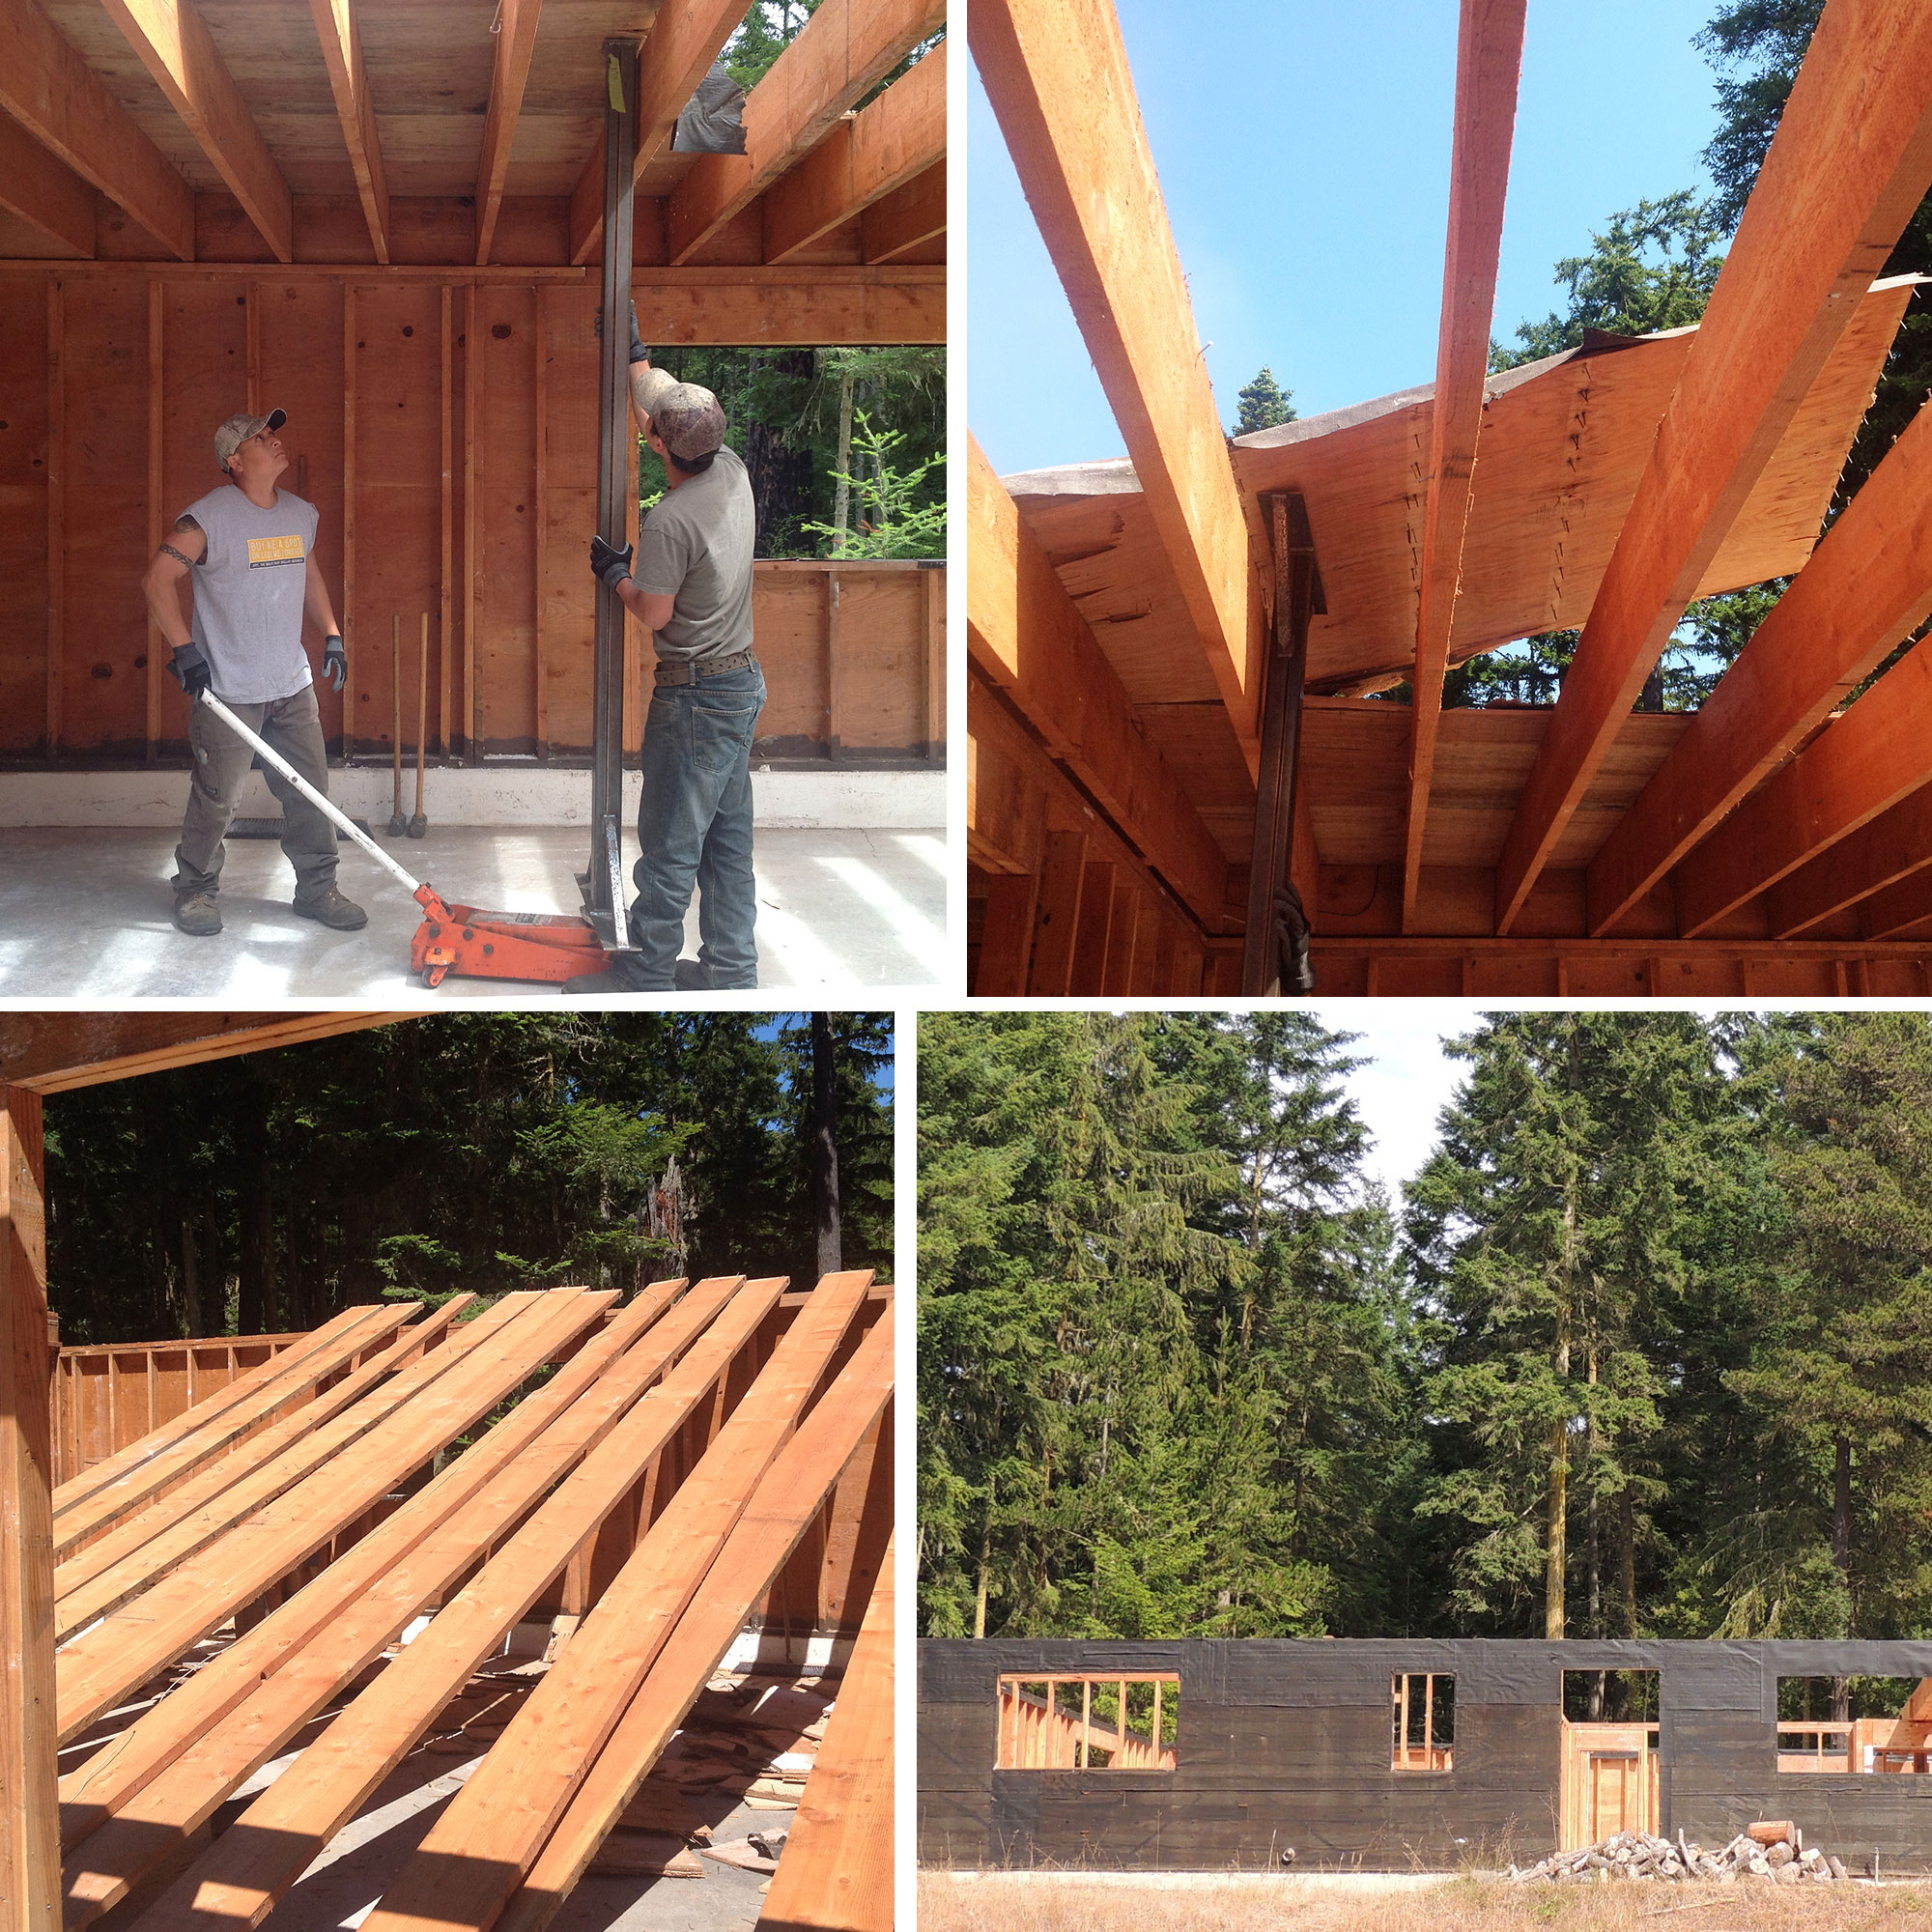
STRUCTURAL INSULATED PANELS (SIPs)
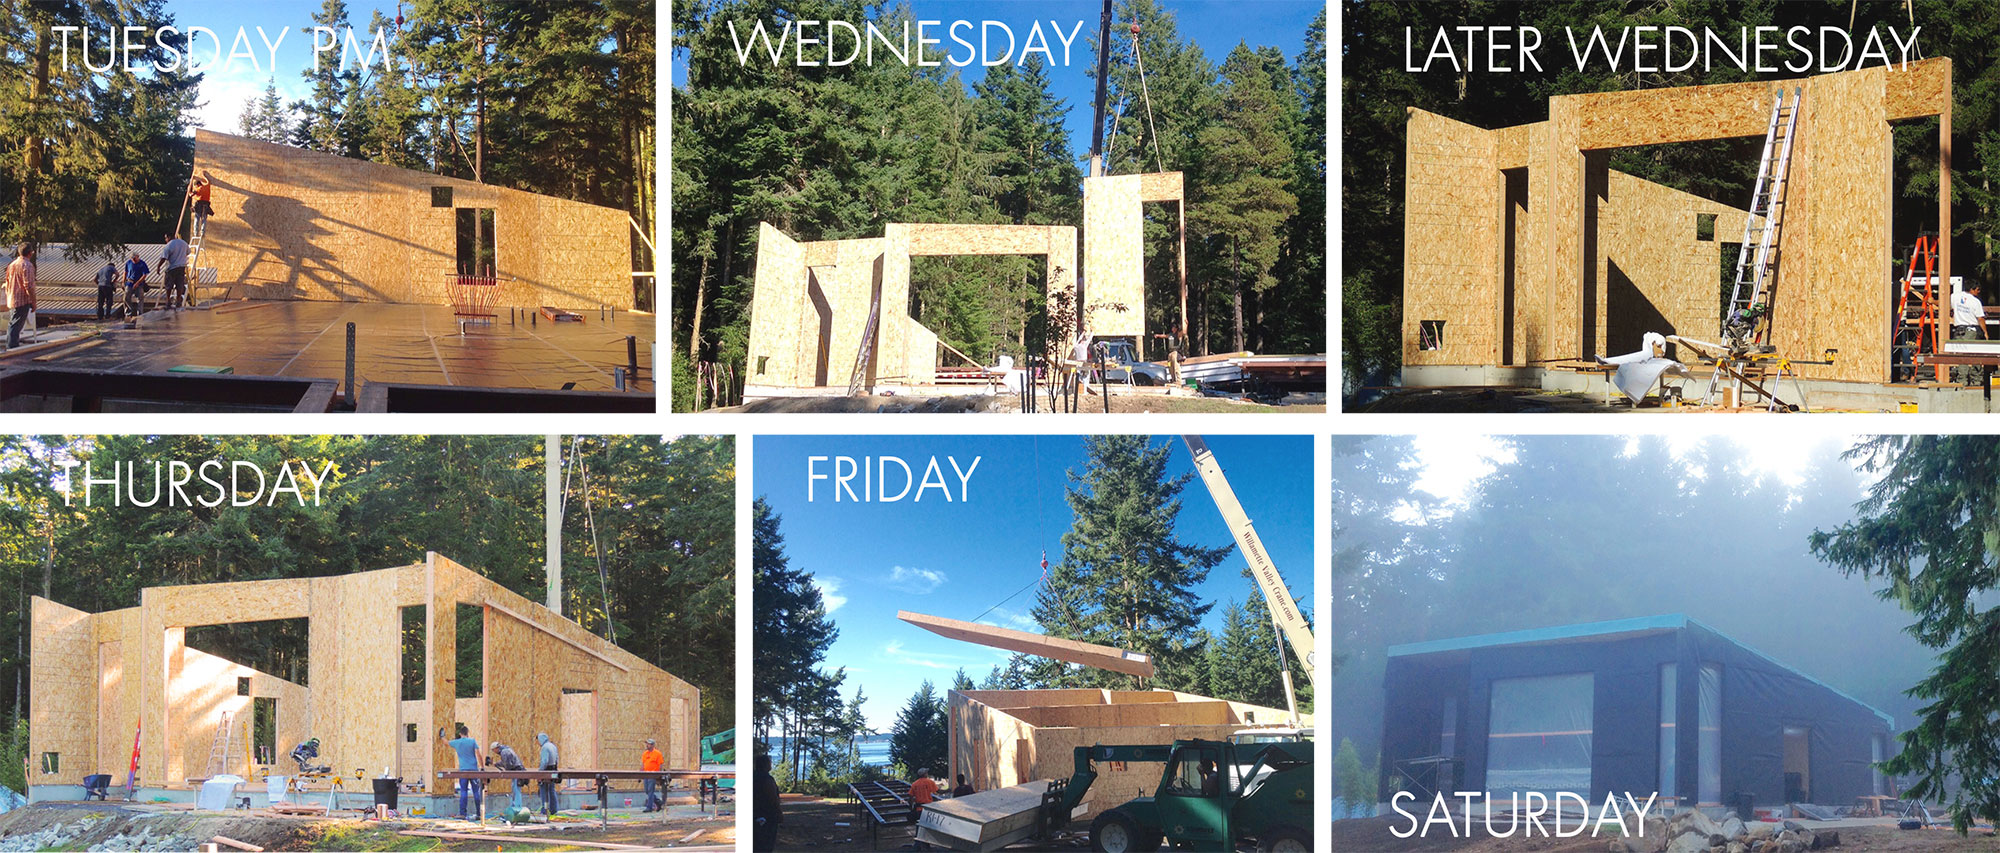
Could the Barn Gallery have been built in five days with traditional framing? Pretty unlikely, at 1600 square feet in size, on an island with limited resources, and doing it the traditional stick-build way. The SIPs build crew was in and out in less than one week. The windows and doors were delivered and installed in 2 days. That’s fully closed in after only 7 days! Ready for the internal infrastructure and finish.
Consulting engineer Brandon Helms reviewed the plans and specified all structural components, which were then incorporated into the Premier SIPs at the factory. Brandon also specified one glulam to be added on-site to reinforce the 16’ clear window span.
The INCLINDESIGN team put a great deal of thought and planning into the implementation of the electrical, plumbing and ventilation infrastructure, so it was a smooth transition for the trades to work on a SIPs build project for the first time. Part of this was the design of a 12” X 44 foot ‘mechanical chase’ along the upper portion of the center wall, which accommodated long runs of plumbing and electrical.
Planning and designing comprehensively for the infrastructure (including all mechanical/electrical) in advance, saved time and money on-site.
SIPs are considered energy efficient due to the factory fabrication process, and are a major contributor in reducing construction waste. More on SIPs
What we learned was that a SIPs “plan” can be designed by and for the fabrication process (most profitable for the factory). A SIPs “plan” can be designed by the architect/ designer for cost-effective installation on site, and to efficiently accommodate the interior infrastructure. These “plans” are not necessarily the same!
Given the speed of the build, the resulting “tight house”, and the clients’ cost effective energy focus, we would absolutely opt to use SIPs for future design/build projects.
Frequently Asked Questions
Why not LEED or Green Build accreditation?
All very well if a building meets the most stringent “accredited” criteria yet it doesn’t function well. Our goal was to follow the best practices for the design/build process and for the experience criteria, while not getting derailed by an expensive & time consuming (burdensome) external regulatory process.
Why not solar?
We did not include a solar system as this was designed from the outset to be an energy-efficient house; and the cost of a solar installation would have taken >20 years to recover (a bit less perhaps with rebates). However, our goal was a cost-effective sustainable build to a budget, and after professional evaluation and lengthy debate, we selected the best-value technologies for the project. For a number of reasons, not least siting and environmental considerations, solar did not make the cut. Though we did however make the house solar-ready should the economics become more favorable in the future. Additionally, the clients’ location already benefits from relatively low-cost energy, so reducing these costs was deemed a lower priority.
How can you tell how you are doing?
The accreditation ratings tell you what you should do, but how do you know how you are doing after the build? Smart houses are not smart enough yet to provide us with all the consumable data we would require to tell us how we are really doing. The Energy Detective (TED) monitors the Barn Gallery energy consumption, both overall consumption and six specific energy users. It can be monitored remotely and has already been invaluable to understand the Barn Gallery energy use.
How did the planning/building department react?
We had a favorable experience, which exceeded our expectations. Generally the inspectors were well informed about the products we were installing. However one issue was fire codes vs the ventilation (airflow) requirement for SIPs (tight house) construction and we question how this will be resolved in the future.
SUMMARY
Research and thorough planning are key to finding out what you don’t know, as well as finding out about new technologies and products, and how to integrate them into a sustainable design/build successfully.
We feel that how a building feels and works for our clients is a better measure of success than a ‘rating system’. Though when best practices are used and technology is a means rather than the end, it can coincide.
Our goal is to facilitate a continuing discussion for a better understanding of smart, efficient, houses that feel good for the occupants.
SUSTAINABLE DESIGN
Sustainable design is focused on minimizing the depletion of natural resources, so the decisions and actions of today do not inhibit the opportunities for future generations. In other words design for maximum re-use of existing or renewable resources. Our sustainable design focuses on energy conservation and we choose the infrastructure appropriate for each aspect to accommodate this effectively.
LINKS:
The Barn Gallery ~ Dwell Magazine website
The Barn on Lopez Island ~ OBJEKT International
The Barn Gallery ~ INHABITAT
The Barn Gallery Sustainable Design~ Northwest EcoBuilding Guild
Green Home Tour Poster~ Barn Gallery infrastructure
Our Sustainable Design Story ~INCLINEDESIGN
PR: INCLINEDESIGN Caroline Di Diego (CASUDI)